Bike#

Our unique approach allows for anyone to integrate Bike Routing and Navigation instantly with just a few lines of code. Take advantage of our industry-leading detail and features, built specifically for bike, and refined for over a decade.
Get Bike Directions#

You can get a bike route using planBikeRoutes(). This route is for riding the bike the entire way between the given start & end points.
import CitymapperNavigation

CitymapperDirections.shared.planBikeRoutes(
    start: CLLocationCoordinate(latitude: 51.504175, longitude: -0.105884),
    end: CLLocationCoordinate(latitude: 51.498255, longitude: -0.098251),
    profiles: [.quiet, .regular, .fast]) { (result) in
    switch result {
        case .failure(let error):
            print(error)
        case .success(let data):
            guard let route = data.routes.first else {
                return
            }
            // Display the Route
    }
}
//suspend function
coroutineScope.launch {
    val result = CitymapperDirections.getInstance(context).planBikeRoutes(
        start = Coords(51.504175, -0.105884),
        end = Coords(51.498255, -0.098251),
        profiles = listOf(Profile.Quiet, Profile.Regular, Profile.Fast)
    ).execute()
    when (result) {
        is ApiResult.Failure -> {
            Log.e("DEBUG", "ApiResult failure", result.exception)
        }
        is ApiResult.Success -> {
            val route = result.data.routes.first()
            // Display the Route
        }
    }
}

//callback
CitymapperDirections.getInstance(context).planBikeRoutes(
    start = Coords(51.504175, -0.105884),
    end = Coords(51.498255, -0.098251),
    profiles = listOf(Profile.Quiet, Profile.Regular, Profile.Fast)
).executeAsync { result ->
    when (result) {
        is ApiResult.Failure -> {
            Log.e("DEBUG", "ApiResult failure", result.exception)
        }
        is ApiResult.Success -> {
            val route = result.data.routes.first()
            // Display the Route
        }
    }
}
CitymapperDirections.getInstance(this).planBikeRoutes(
        new Coords(51.504175, -0.105884),
        new Coords(51.498255, -0.098251),
        Arrays.asList(Profile.Quiet, Profile.Regular, Profile.Fast)
).executeAsync(result -> {
    if (result.isSuccess()) {
        DirectionsResults results = result.getSuccessData();
        Route route = results.getRoutes().get(0);
        // Display the Route
    } else {
        Log.e("DEBUG", "ApiResult failure", result.getFailureException());
    }
});
Set Bike Route Profiles#
The Citymapper SDK currently supports getting up to 3 different bicycle Routes. (In practice, the results may not actually be different from each other if there's only a few optimal paths for your start & end point.) If the profiles parameter is omitted, the regular profile is used.
| profile | description |
|---|---|
quiet |
Attempts to use roads with less traffic |
regular |
The default profile, balances traffic with directness |
fast |
Attempts to find the shortest sensible Route |
Display Bike route in a list#

The Route List displays a list of possible Routes for your user to choose from.
To obtain a list of routes see Planning routes
Android#
Add a CitymapperRouteListView to your layout
<com.citymapper.sdk.ui.routelist.CitymapperRouteListView
    android:id="@+id/route_list"
    android:layout_width="match_parent"
    android:layout_height="match_parent" />
Then pass the directions results to the view when they have loaded
val routeListView = requireViewById<CitymapperRouteListView>()
routeListView.setRoutes(routes) {
  // Handle result click (see below)
}
CitymapperRouteListView will take care of updating the Routes with the latest departure data as appropriate, while it is visible on screen.
The CitymapperRouteListView contains a RecyclerView internally. If custom content needs to be displayed as part of this list, and it can not be set up in a separate container using nested scrolling, an additional RecyclerView.Adapter can be passed to the view to supply items which will be appended to the start of the list.
routeListView.setHeaderAdapter(adapter)
Alternatively (since the number of routes is generally <=5) the whole view can be embedded within a larger scrolling view. In this case it may be necessary to disable nested scrolling.
routeListView.isNestedScrollingEnabled = false
Route selection#
The setResults method of CitymapperRouteListView takes a lambda which is called when a user clicks on a Route.
To display the route in detail see Display the route in details
iOS#
In iOS, the Route List is a UIViewController that you can add as a subcontroller to the main one for your screen. The width is intended to be the full-screen width, the height can be calculated via the contentHeight(forWidth: CGFloat) -> CGFloat method.
let vc = RouteListContainer.createWrappedRouteListController(routes: routes, delegate: self)
addChild(vc)

let width = self.view.frame.width
let requiredHeight = self.routeListViewController.contentHeight(forWidth: width)

vc.view.frame = CGRect(x: 0,
                       y: 300,
                       width: width,
                       height: requiredHeight)

view.addSubview(vc.view)
vc.didMove(toParent: self)
Handling Panel Height Updates#
Route List Controller is a UIViewController, that conforms to the protocol RouteListController
Above we see contentHeight(forWidth: CGFloat) -> CGFloat provides a mechanism to calculate the height required by the Route List controller once it's initialized, but before it's displayed on the screen.
However, the height required by Route List controller can also change whilst it's being displayed on the screen. This is due to route icon wrapping and live times changing.
In order to handle this 'in flight' height change RouteListDelegate has a required method listContentHeightUpdated(newHeight: CGFloat)
extension ViewController: RouteListDelegate {
    func listContentHeightUpdated(newHeight: CGFloat) {

            // Update layout constraints or directly manipulate the frame
            // on your RouteListViewController instance.

            DispatchQueue.main.async {
                var oldFrameWithAdjustments = self.routeListViewController.view.frame
                oldFrameWithAdjustments.size = CGSize(width: oldFrameWithAdjustments.width,
                                                      height: newHeight)
                self.routeListViewController.view.frame = oldFrameWithAdjustments
            }
    }

    // ...

}
Route selection#
Set the delegate: RouteListDelegate property on RouteListViewController then listen for calls.
protocol RouteListDelegate {
    func showRouteDetail(for route: Route)
}

public class MyViewController: UIViewController {
    // ...
}

extension MyViewController: RouteListDelegate {

    func showRouteDetail(for route: Route) {
        // Handle result click
    }
}
Display Bike route details#
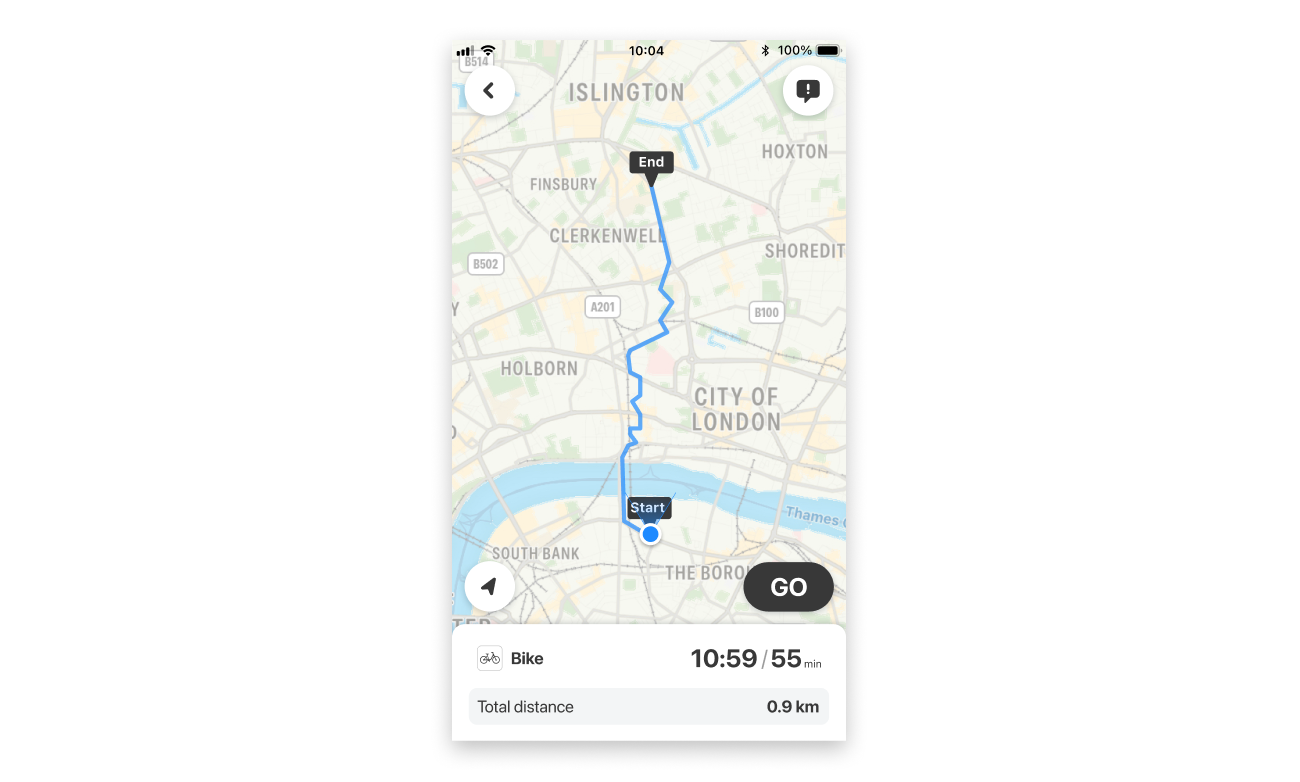
The Citymapper SDK also supports displaying the Bike route in a standalone detailed screen. It displays an overview of the route, with a "GO" button to start navigation.
let route = ... // A previously obtained Route object
let navigationTracking = CitymapperNavigationTracking.shared

let navigableRoute =
    navigationTracking.createNavigableRoute(
        seedRoute: route,
        trackingConfiguration: TrackingConfiguration(...)
    )

let vc =
    DirectionsViewController(
        for: navigableRoute,
        configuration: DirectionsViewController.Configuration(
            navigationControls: .defaultControls,
            stopNavigationTrackingAction:  { _ in .displayOverview }
            closeAction: { [weak self] in
                self?.navigationController?.popViewController(animated: true)
            },
        ),
        theme: BasicTheme()
    )

show(vc, sender: self)
val route = ... // A previously obtained Route object
val directionsView = CitymapperDirectionsView(this)

setContentView(
    directionsView,
    ViewGroup.LayoutParams(
        ViewGroup.LayoutParams.MATCH_PARENT,
        ViewGroup.LayoutParams.MATCH_PARENT
    )
)

directionsView.configure(
    navigationControls = Default,
    onStopNavigationTracking = { DisplayOverview },
    onClose = { onBackPressed() }
)

val navigationTracking = CitymapperNavigationTracking.getInstance(this)
val navigableRoute =
    navigationTracking.createNavigableRoute(
        route,
        TrackingConfiguration(...)
    )

directionsView.setNavigableRoute(navigableRoute)
For more details, check out
Visual styling#
The Citymapper SDK offers theming capabilities to help it fit in with your app.
For more details, check out